Wednesday, December 30, 2015

Tutorial - Leaf ornaments


Some years ago I bought the children's book The Snow Tree by Caroline Repchuk, illustrated by Josephine Martin. It is delightful. I don't usually buy books (I'm more of a public library person) but this one was just too cute. The storyline starts with Little Bear coming out of his den to find the whole world covered in white. "Where have all the colors gone?" he wonders. Then various forest animals start appearing with offerings of color to hang on a snowy tree. So I bought a small, fake, snowy tree and decided to make ornaments to go along with the story. The first animal to arrive is Lynx, who brings orange leaves to remind them of fall and of sunsets.
Supplies, clockwise from upper left corner: Sculpey UltraLight polymer clay, the largest Ivy Leaf Embossing Cutter by Lisa Pavelka, rubbing alcohol, Tim Holtz Adirondack alcohol ink in Butterscotch and Mountain Rose, PearlEx mica powder in Sparkle Gold, eye pins (any brand or color will work), a paintbrush, and gloves. You can mix/match/omit/substitute any materials you wish to--this is just how I did it. Not pictured: an oven for baking.
Condition the Ultralight and roll it flat (Here I've used the thickest setting on my pasta machine). Using the leaf cutters, make as many leaves as you want. Smooth any ragged edges with your finger.
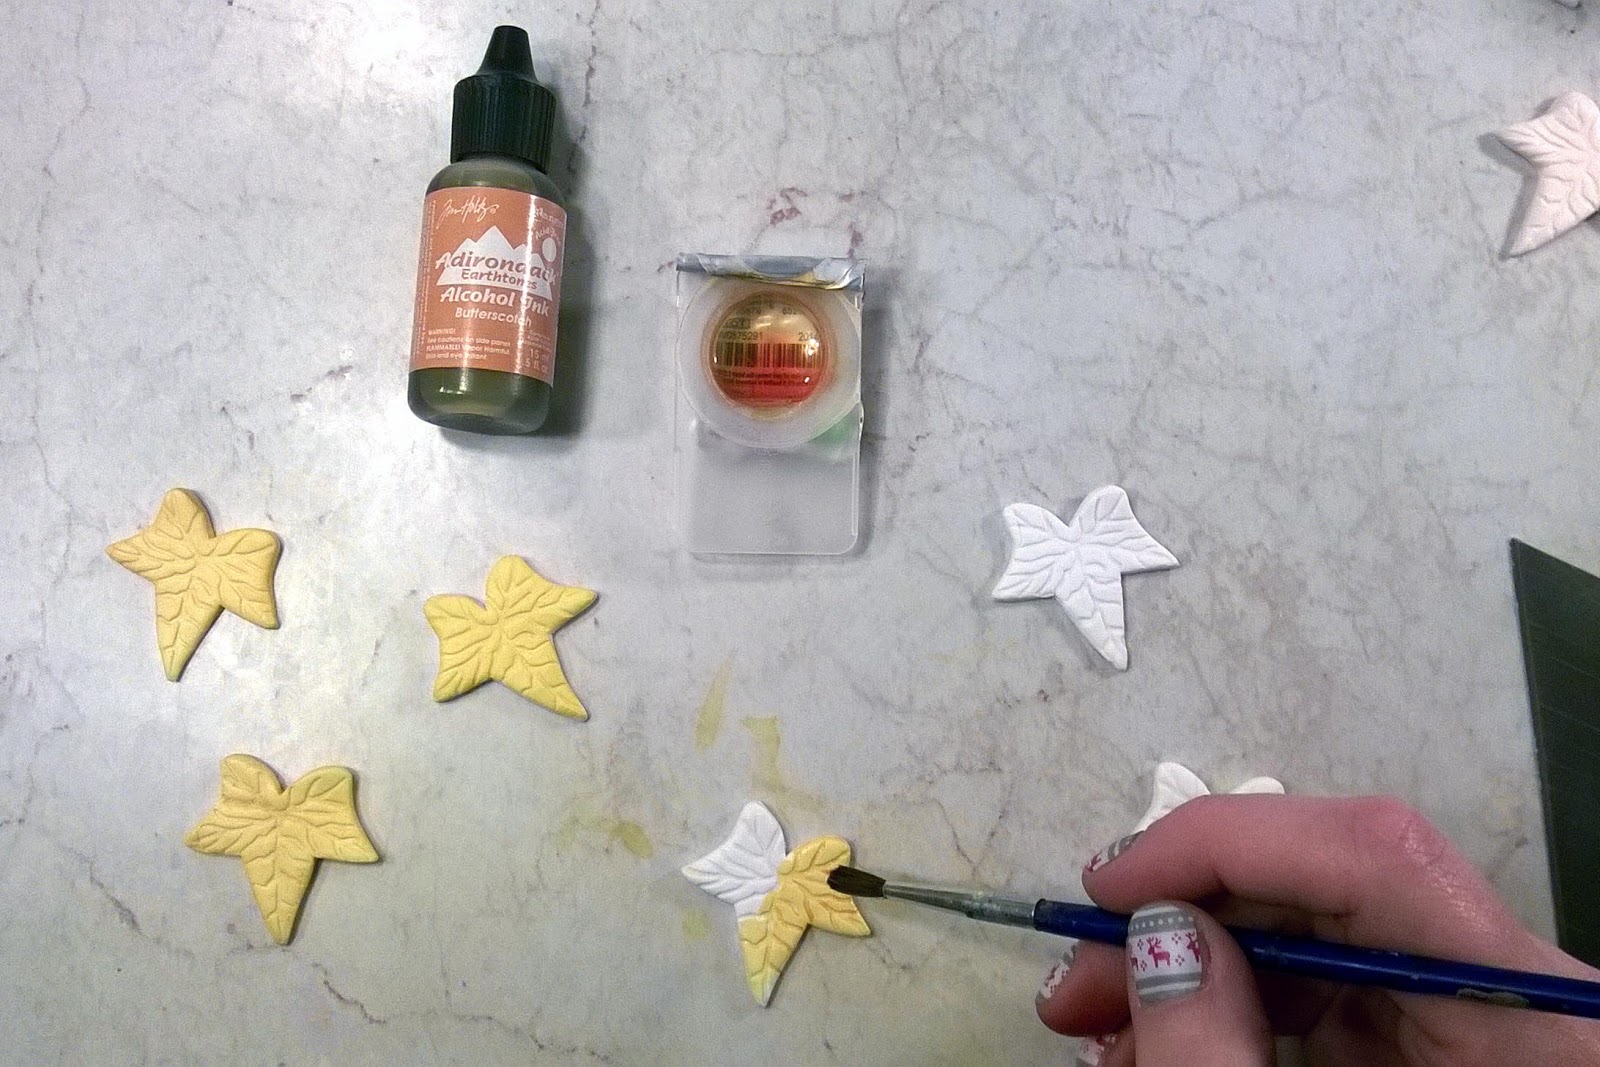
Using a bit of rubbing alcohol and five or six drops of Butterscotch alcohol ink, brush the front, back, and sides of the leaves with a wash of color. Since I only needed a small amount of ink mixture, an old, clean contact lens package was the perfect size. Note: alcohol ink can stain some surfaces, so you may want to put down a protective covering (which I didn't).


Make another alcohol ink/rubbing alcohol mix using Mountain Rose ink and dab it on the outside edges of the leaves - I did this only on the front of the ornaments. I wore gloves to avoid dyeing my fingers pinkish-orange.

Insert a short eye pin into each leaf. Try to keep it from poking out the front or back, which can be tricky.

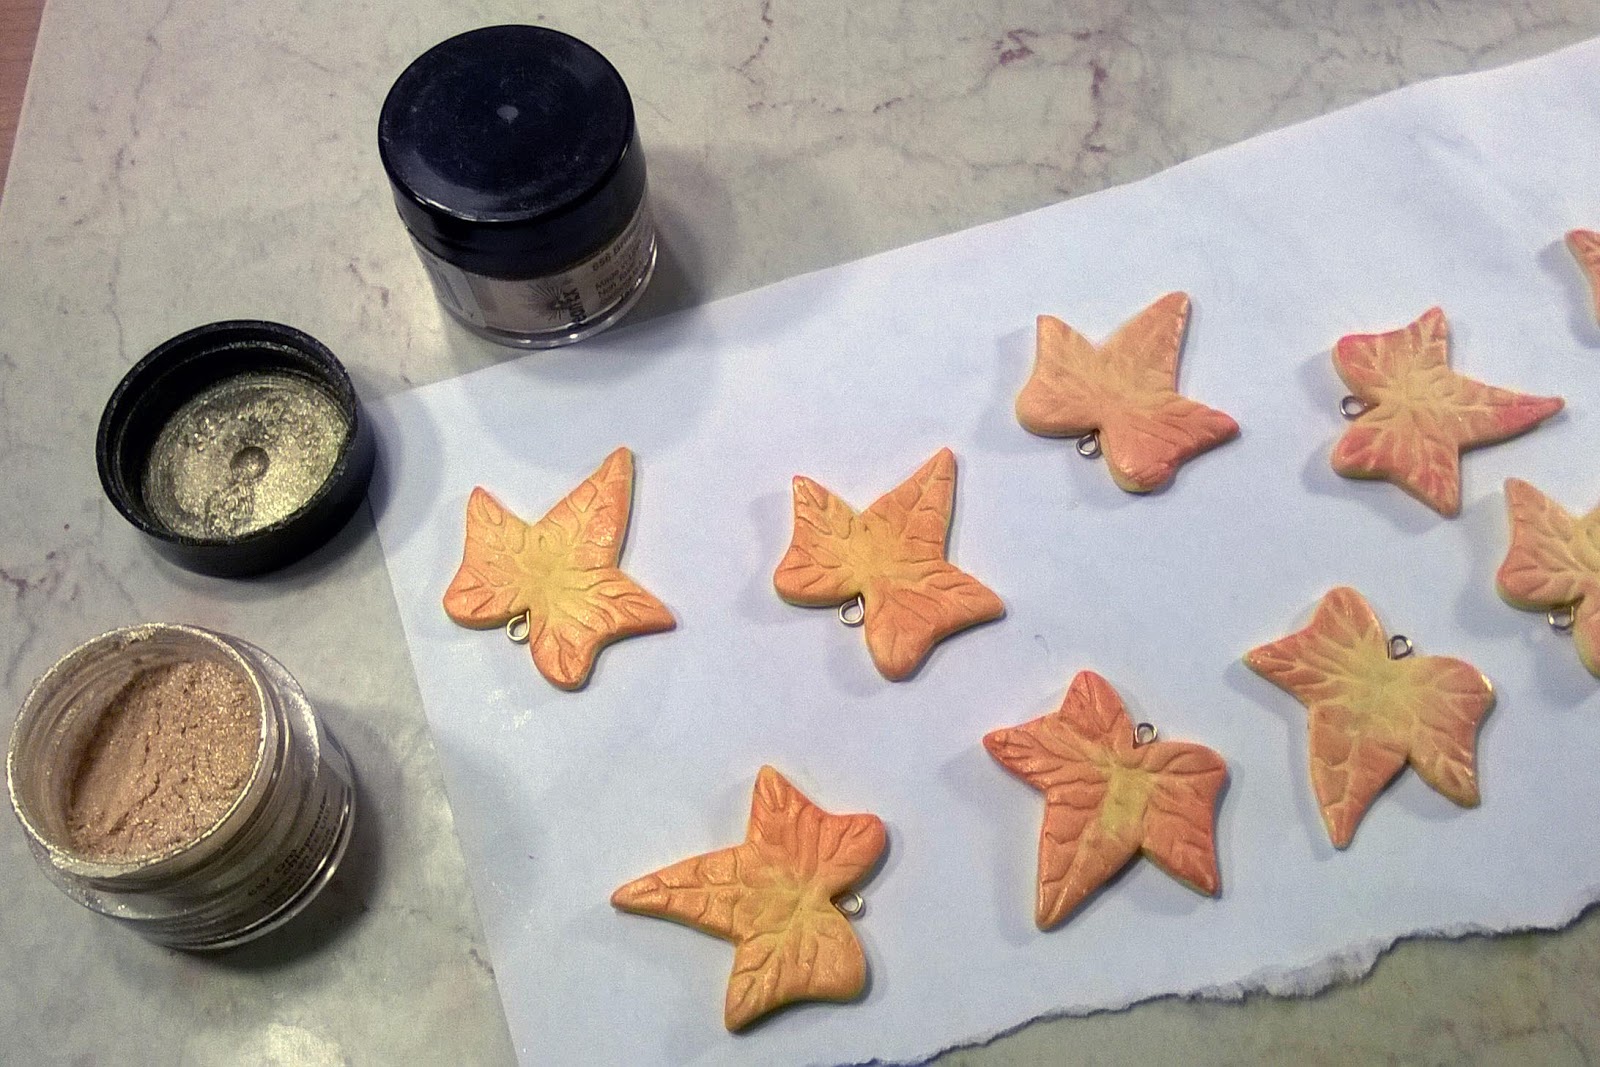
As an afterthought, I lightly dabbed some gold mica powder on the front of the leaves. BAKE according to the instructions for the specific clay you are using. For UltraLight, it's 15 minutes for every 1/4 (6mm) inch at 275°F (130°C). See * note below.

When I checked the leaves after about 15 minutes, the backs of some of them looked quite thin and breakable (I could see the eye pins), so I reinforced them with more UltraLight and alcohol ink and baked again. *I have an oven thermometer and can be sure that the temperature never gets higher than 275°F, so I left the leaves in the oven for about forty-five minutes to make them stronger.

And ta-da! Orange leaves from Lynx. You can then attach hooks to make ornaments or findings to create jewelry or anything else your creative mind can come up with.

Here is the entire process in one picture (R-L): roll out clay, cut leaves, wash with diluted alcohol ink, dab the edges with diluted alcohol ink and gold mica powder (not pictured), insert eye pins, and bake. I will probably spray mine with an acrylic sealer to protect the ink and powder.

Wednesday, November 12, 2014

Learning to Metalsmith

  Wow. I knew it had been a long time since I posted, but I didn't know it had been THAT long. This is my first post of 2014!
  The most recent development in the life of Sleepy Turtle Beads is that I am taking a metalsmithing class at my university. I love it. Each class is about 3 hours long, and I usually stay after for another hour. I have learned how to solder, anneal, file, hammer, dap, sand, saw, and polish metal - mostly copper and sterling silver. I bought a small slab of sterling silver at the beginning of the semester, then melted it down and made silver sheet and wire. The butane torches are a bit scary(that is a LOT of heat), but I'm getting more and more comfortable using them.
  Here are a few of the projects I've been working on:

Hammered copper earrings
 
Sterling silver pendant with copper and brass hearts

This is the second bezel I made - pretty rough, but I set it with a stone and gave it to my mom for her birthday.


I like to make knot rings in copper and sterling silver
  I have more projects in the works and some that currently exist only in my head. More to come!

Tuesday, December 10, 2013

Last Christmas my sisters and I decorated faux gingerbread houses made from polymer clay. Yesterday, I finally got them assembled into ornaments.
Mine (This picture was taken with my sister's nice camera)
My sisters' (This picture was taken with my cheap camera)

 Now to hang them on the tree!

Monday, December 2, 2013

Tangled - but not in a nice Disney way.

Today I spent more than two hours on this silk-and-coral-chip necklace, and it was pretty...until it tangled beyond rescue. Blah.

Sunday, August 18, 2013

A few things I've been working on lately

 Polymer clay sugar cookie set
 Animal print polymer clay discs
 Vintage-look pendant
 
Copper chain and pearls
 Fun, lightweight acrylic beads
Jewel-tones bracelet

Wednesday, June 19, 2013

Peanuts and Popcorn

For some reason, these brightly-colored striped polymer clay rounds have always been "circus beads" in my mind.

Tuesday, February 19, 2013

My Beading Buddy

This picture was taken before I had a designated bead room. 

Once I got my bead room, the plan was to keep all cats out in order to keep their fur out of my clay, but my devoted Scrawny wouldn't hear of it and I caved. She wants to be where I am, and that is worth digging a few hairs out of my clay.

Tuesday, February 12, 2013

Money vs. Art - who will win?

    I'm having a crisis of pricing. Back when I used only store-bought beads, pricing was simple. Just add up the cost of materials, add time invested, and you have a reasonable price. But now that I'm doing so much with polymer clay, it gets hugely more complicated. 
    First of all, it's a lot harder to keep track of time invested when making clay beads because there are so many different parts to the process. Mixing, forming, baking, sanding, varnishing...it doesn't all happen in a nice measurable chunk. 
    Second problem: Say I do manage to get an accurate time for a project. If I charged for my usual rate per hour, the cost would be gigantic! Sanding alone can take 5 or more hours. Then what if I put the beads in the rock-tumbler instead of sanding? That takes a lot longer, but it's not my time it's using. So do I charge for the amount of time it would have taken if I had hand-sanded the beads?
    One way to do it would be to not worry about materials or time, but evaluate the finished piece and decide what it's worth. But that kind of imprecision terrifies me! It feels like walking across a highway with my eyes closed. With my system, I always had something concrete to rest on. If someone were to ask, "why is this so expensive?" (which, come to think of it, has never actually happened), I could get out my little book of records and show them exactly why it cost that much. But if someone were to ask about a clay piece, what would I say? "Well, uh...I don't know...on the day I chose the price, I must have been in an expensive mood and I decided it was worth that much..I am as puzzled as you are at the high price. What was I thinking?"
    See what I mean? This ever-present dilemma is starting to keep me from claying and beading, which is just tragic because I love to make jewelry. The technicalities of selling are overwhelming me. I could stop selling altogether, but I already have hundreds of finished pieces and a thousand clay beads just sitting and waiting to be used. I couldn't possibly use or give away all the things I make. It would be a shame to keep them hidden away in my bead room, wishing to be appreciated.
    So, yeah. That's my issue. Money and marketing sticking their noses into my art.

Saturday, December 8, 2012

Some things I've been working on lately:

Experimenting with faux-quilting. My technique still needs some fine-tuning, but I think they turn out nicely. I'm excited to try more colors and patterns.
I've been making LOTS of ornament charms in preparation for my Christmas boutique. I love the way they turn out, but working with glitter is such a pain.
I have a lot of work to do in the next week before the Christmas boutique. I wish I didn't have a final exam to steal my time.

Monday, October 8, 2012

Polymer Clay Color Recipes - Ceramic Tones


This is one of my favorite palettes from design-seeds.com (check it out, they have many) and I used it to formulate some polymer clay color recipes that I then used for the pebble beads above. They're not perfect - feel free to tweak them if you like - but I did my best. Enjoy!

The taupe color gave me the most trouble, as you can see by all these failed attempts, but I eventually found a color I am happy with!

 All color recipes use Premo Sculpey polymer clay. You may use these recipes in anything you make or sell, but if you post them, please link back to me at http://sleepyturtlebeads.blogspot.com. Thank you!
(from top)

Taupe                                                    Brown                                                  Dark Gray
8 parts White                                        10 parts Rhino Gray                            2 parts Black
2 parts Beige                                         2 parts Burnt Umber                           1 part White
1 1/2 parts Blush                                   1/2 part Denim                                    1 part Rhino Gray
1 part Denim
1 part Sunshine
1 part Black


                                 Light Gray                                              Beige
                                 11 parts White                                        22 parts Beige
                                 2 parts Black                                          1/2 part White
                                 1/2 part Denim                                       1/8 part Black
                                 1/2 part Blush                                        1/8 part Blush

UPDATE  It has come to my attention that Polyform has reformulated the Premo! Sculpey color "Rhino Gray" since I came up with these recipes, which throws off the color recipes for Brown and Dark Gray.  I intend to re-do those two recipes to see if I can make them right.  Until then, my apologies!

Wednesday, September 19, 2012

Mica Shift Confetti Tutorial

This tutorial is for a mica shift technique that reminds me of confetti. You can do whatever you want with the patterned sheet, or follow the rest of my instructions to make pendants.

 MATERIALS:
  • pasta machine
  • acrylic rod or brayer
  • blade(s) for cutting
  • needle, straw, and/or other tools for making holes
  • pearl or metallic polymer clay - this technique will not work with regular clay
  • (optional) solid-colored clay for backing pendants


(L - R) Premo Magenta Pearl polymer clay, Premo black polymer clay, acrylic rod, flexible blade, straight blade.


When you first run your pearl or metallic clay through the pasta machine, you can see dark streaks because the mica particles are not aligned yet.


1. Fold the clay sheet in half and run it through the pasta machine, fold first, on the thickest setting.


 Repeat 10 -12 times or until the streaks are gone and the sheet is all one shade.  This will also condition the clay, making it pliable and mixing the plasticizers together for maximum strength.


2. Place the clay sheet on your work surface (I use a large ceramic tile) and cut into a squarish shape. Save the extra pieces!


 3. Take one of the cut-off edges and slice off each side so that it has a defined edge.


4. Make criss-cross cuts, creating irregular shapes.


 5. Lay the little confettis onto the square sheet you made in step 2.


 6. Use a roller or brayer to flatten the pieces into the square sheet. Notice how you can see the dark edges where the mica particles are not facing up.


7. Using another sheet of aligned clay, repeat step 4, making slightly smaller shapes. (If necessary, run your scraps through the pasta machine again until you have an aligned sheet)


8. Place these new confettis randomly onto your square sheet and again flatten them with a roller. Repeat with smaller confettis until you like the way it looks.


 9. Run the sheet through the pasta machine at the thickest setting, then at progressively thinner settings until it is completely smooth.


At this point you have a mica shift confetti sheet, with which you can do whatever you like - cover a tin, make hollow lentil beads, etc. To make pendants, continue to step 10.


10. Using your blade(s), cut the confetti sheet into whatever shapes you'd like.


11. Condition some black clay.


12. Make a sheet of black using the thickest setting of your pasta machine, lay a confetti shape onto it, and cut around the shape leaving a small border.


13. Use a needle, straw, or other tool to make a hole in your shape, if desired. If you want to glue a bail to the back of your shape, like I do with the pentagon in the left corner, it doesn't need a hole.


14. Bake your shapes according to the manufacturer's directions on a blank piece of paper or cardstock (to avoid shiny spots) over a ceramic tile. If you have an oven thermometer and can be sure that the temperature of your oven never goes above the manufacturer's specified temperature, you can bake your pieces for longer than recommended to give them some extra strength.

15. Sand and buff, if desired.  The two shapes on the right have been sanded with wet/dry sandpaper in 400-, 600-, 800-, 1000-, 1200- and 1500-grit, while the shape on the left has not been sanded at all.  I have read that sanding brings out the depth of mica shift, but it seems to have actually done the opposite here and flattened out the effect.  Hmm.  I'd say if you're happy with how smooth your pendants are, leave them unsanded.

That's all there is to it! I hope you have enjoyed this tutorial. Please leave suggestions and comments so I know what I can do better in the future.